Friday, February 27, 2009

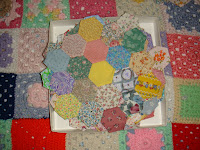
HEXAGON MADNESS- GRANDMOTHER'S GARDEN QUILT/ HEXAGON QUILT!

This quilt began when I headed to a rummage sale at the nearby Seniors home and found a box of partially completed grandmother's garden quilt blocks and HUNDREDS of hexagons still left to be sewn! I bought the box, two hexagon templates and a pair of scissors for $2

I began hand-sewing the rest of the fabric into GG blocks- a process that took on and off three months! 

I think I ended up with 50 GG blocks and since I wanted to use everything and I didn't want to use a solid colour fabric to divide each block I sewed everything into a HUGE mosaic. I REALLY wanted to get the quilt done!!!!!

After taking the quilt class with Johanna Maskow in September, I completed the hexagon quilt at home on my own in October. I used scrap fabric for the trim and it turned out quite nicely! 


Thursday, February 26, 2009

SIMPLE PILLOWCASE SUMMER DRESS- FAUX SMOCKED

This was my first attempt at making clothes and working with elastic thread!! The dress was made from a 99 cent pillowcase and elastic thread! Total cost $5. A great tutorial for sewing with elastic thread is found here.


Wednesday, February 25, 2009

MORE ADORABLE BUNNIES

Here are my two lovely bunnies sewn from Romantic Home Sewing by Christina Strutt. Aren't they adorable? The girl bunny is the original pattern. She comes with a dress and a pinafore. I also made a boy bunny with a lovely tie! You have to pardon my embroidery skills!!


Monday, February 23, 2009

MY FAVOURITE CLUTCH

This was one of the first things I made on my own soon after I was comfortable with sewing. It's a simple clutch made with polka dot linen on the outside and strips of scrap fabric on the inside. I used batting in between layers to cushion it a little. I used a blanket stitch around the flap, used snap buttons for closing and added a strap, which can be tucked on the inside. It's suprisingly roomy!  I simply love it!

The yellow clutch is what I made for my sister. I used a vintage print fabric which I bought from a rummage sale for 50 cents!!!


BATHINA HANDBAG


Thursday, February 19, 2009

PRETTY, HOMEMADE, PERSONAL BUSINESS CARDS

I always wanted to have my own business cards and after graduating with my M.A degree, I figured it was the perfect time to get them done to show off my titles. I was also growing tired of scribbling telephone numbers and 
e-mails in pieces of paper.

I saw online ads that offer 250 business cards for free and you pay only shipping and handling, but two reason were stopping me: 1) I don't know what to do with 250 cards 2) I don't have a credit card. 
Being creative, I knew I could make my own cards! But how? I knew I wanted something pretty, inexpensive and I wanted to control how many I had. I realized that I had a box of perfume cards that I collected over the years at the mall. Why not use them? They are FREE, come in stiff paper, different shapes and sizes and I can pull out different ones every time!!!

After sorting through HUNDREDS of fragrance cards- men and women fragrances- I headed to Microsoft Word and 
So if you want to be creative, are looking for a cheap alternative to expensive business cards, reuse those pretty perfume cards!!!


For those interested here is a quick tutorial!!

1) Trace the outline of the card on piece of paper. Place the sheet in your printer.
2) Open Microsoft Word. Type your information in small font [size 7, 8, 9 depending on the size and shape of the card]. 
3) Set the colour.
4) Eyeball the position of the writing with the outline of the card.
5) Print it out. This first printout will help you figure out any adjustments to be made. 
6) Once you made your corrections, print it out again. 
7) If the printing is at the centre of the pencil outline of your card, you are ready to print on the cards!!!
8) Place your perfume card on the pencil outline using masking tape.
9) Print!

TIP #1) It is good to have extra cards in case you mess up- and you will mess up, believe me!!!!
TIP #2) If you like your cards to smell pretty, spritz the perfume and let it dry before printing.

***These cards are strictly for personal use only. No infringement intended***

Monday, February 16, 2009

MY FIRST NINE PATCH QUILT

In September 2008, I took a three part class at The Workroom and learned to make the nine patch quilt!
The class was taught by the renowned Johanna Masko, quilt-master par excellence!

We were supposed to  complete a 9 blocks quilt, instead I did a 36 blocks quilt. I worked on the other 27 blocks the week prior to the last class and used all the fat quarters I bought for the project. I considered that I couldn't really 'use' or enjoy a baby nine patch quilt. I wanted something big enough to throw on my lap.

The quilt turned out so HUGE [64"x80"] that for the back of the quilt, I headed to Goodwill and bought a king sized bedsheet!!! Boy oh boy! Prepping the top layer, the batting and the backing took LOTS of pins and patience! I had never sewn anything that large before and I was afraid it wouldn't get through the machine but we made it work!

Johanna was so impressed that she mentioned my quilt on her blog!!!!

From 9 fat quarters...

To a completed quilt!

Friday, February 13, 2009

BUNNY PENCIL CASES

This week I worked on three bunny pencil cases from Zakka Sewing. I was very happy to come across this pattern on Craftzine.com! I'm so happy with the way they turned out! I used linen, scrap fabric for the lining and I did not use the batting in between layers. I also embellished the bunnies by using embroidery floss for the nose and eyes! I'm getting addicted to sewing with zippers!


Sunday, February 8, 2009

Here are two other Brazilian hipsters that I made for my best friend. I really hope she likes them. I'm mailing them out tomorrow. It would be quite the kicker if she received them before Valentine's Day! I got the wide stretch lace at Downtown Fabrics for $3.50/m. I highly recommend going there!!


FIDDLING WITH METAL FRAME PURSES

Finally I made my 2nd coin purse [the first was for my sister]! I bought the frame about a month ago and even though it's a quick project to sew, I waited all this time to get it done! I used the U-Handbag tutorial and the instructions were easy to follow which made it all a breeze. 
I used a sew-on frame not knowing there were frames you sewed on and those your glued on. I just thought the scalloped edge was cute. As of now I'm comfortable with the sew-on frames. I can always take it out if I make mistakes or if I feel like changing the fabric, I can redesign a new purse. I would love to make an elegant clutch but I have yet to find the perfect frame!


Friday, February 6, 2009

UNDERWEAR ADVENTURES- PART 2

In the second class we made the hipster. I was excited about this class because now we were making something that was more of my element! 

I got 1/2m of 55" wide stretch fabric for $2.

The first pair was challenging as I was trying to work out each step, the elastic and the zigzag stitches  [was I pulling too much or not enough! arrrgggghhh!] . Once everything was done, I was pretty happy with the result considering that with a serger the sewing would have been a snap. 

I made 3 of the green ones and 4 of the lilac ones. The ruffled elastic is very pretty but it's scratchy so I found other pretty elastics which are softer to the skin. I am going to use those for the boyshorts!

Tuesday, February 3, 2009

UNDERWEAR ADVENTURES-PART 1

I am so excited to have learned to make underwear! I took a two part class at The Workroom and learned a lot about working with elastic and stretch fabric. We used the Jalie women's underwear pattern #2568. It comes with a camisole and 3 styles of underwear: Brazilian hipster, hipster and bikini.

The first pair I made was the Brazilian hipster. I admit I was a bit apprehensive and embarassed at the thought of making such 'sassy' underwear, afterall my drawer has always been filled with cutesy cotton printed underwear! 

Due to my hesitation, I didn't dare to buy expensive or a lot of  wide stretch lace. I went to Fabricland and got a great deal [buy 1m get 2m free at $3!!!!].

I was blown away at how easily the hipster came together!!! At home I made two other pairs! I'm absolutely in love with them. They are sooooo pretty and comfortable! Now I can have beautiful,  "expensive looking underwear for a fraction of the cost. 


Sunday, February 1, 2009

2009 CRAFT TO-DO-LIST

Make underwear
Make a pencil skirt
Make a tube top
Make a convertible/infinity dress from rostichery
 Make a string quilt
Make a pair of shorts
Make a pair of pjs
Finish knitting the shoulder wrap
 Make a second snap coin purse
  Make a bunny pencil case from Zakka Sewing
Make a strapless dress
Use bamboo handles for a handbag
 Make a camisole
 Make boyshorts
 Get a serger
 Make a thread holder
Welcome to my blog and to my first post! I'm going to begin with a confession: I am a craft blog virgin!  With so many wonderful craft blogs and bloggers out there, what am I doing?! As of now, I haven't figured out a whole lot but I am very excited about this and I hope that in time, it will get better!
As the name suggests, I am a BEDROOM CRAFTER. Coming up with a cool, catchy name was hard and the ideas that I came up with didn't really reflect who I was! My bedroom is my studio; it is here that I read, plan, sketch, cut, sew and knit! I was never able to craft [particularly sew] or study in the living room. Something about the large room makes me self-conscious!! The bedroom however is the perfect niche!
As I inaugurate this blog, I would like to thank the visitors that passed by and the many who will come. I hope you will find my blog interesting as I share my work, thoughts, tip and other things crafty!